Thursday, August 24, 2006

Changing your X11 window manager

For fun I decided to play around with the window manager I use under X11. It's really simple, but I found it tough to get any info so I hope this will save others time.

Step 1:

Install your new window manager. I used fink to install flushbox and enlightenment, but this method will work for other types of installation.

Step 2:

Create a file in your home directory called .xinitrc and add this single line

exec /path/to/installed/windowManager

Now quit and restart X11. To change back simply remove or undo the changes to the .xinitrc file.

Sunday, August 20, 2006

Nintendo DS settings for sharing WiFi from an ibook.

This took a little playing around, so for the benefit of others, this is how I got Nintendo WiFi Connection (NWC) working. You might want to do this is you lack a wireless router, or like me, you have a wireless router that can't cope with the way Nintendo WFC works.

DS side:
From the start screen Nintendo WFC->Nintendo WFC Settings
Now tap Nintendo Wi-Fi Connection Settings and select one of the 3 connections.

I used the following settings:
SSID = your iBook's name; (see System Preferences->Sharing->Internet)
WEP Key = not set; (A possible security issue, be warned)
Auto-obtain IP Address = No;
IP Address = 10.0.2.11; (The IP of my iBook +10)
Subnet Mask = 255.255.255.0;
Gateway = 10.0.2.1; (The IP of my iBook)
Auto-obtain DNS = No;
Primary DNS = 192.168.2.1 (The IP of my wireless router).

So far I've only seen iBooks use 10.0.2.1 as their internal IP address, but to check you can use the following on the commandline,

ifconfig -a and look for the IP address of en0.

iBook side:

System Preferences->Sharing->Firewall
Stop the firewall. This could be a security risk, however in my setup I can leave my routers firewall turned on.

System Preferences->Sharing->Internet
Choose share your connection from Ethernet.
Then under "To computers using" select Airport.

Finally turn internet sharing on.

You should now be able to run Nintendo WFC in your game and enjoy playing online.
Saturday, August 12, 2006

Changing some default settings.

Here I cover some of the default settings that I've changed on my mac. These may not be to your taste!

System Preferences->Energy Saver:
Optimise for extended battery life when using the battery and performance when on the mains. This is of course for laptop users.

Auto hide the dock: Right-Click (CTRL+Click) the dock. Tick the bottom option.

For the following, open System Preferences:
Keyboard and Mouse-> Keyboard -> Modifier Keys (at bottom of box) -> change caps lock:
A bit idiosyncratic, but I don't use the caps key so it stops me hitting it by accident.

Keyboard and Mouse-> Keyboard -> tick the "use Fn key for F1-F12 hardware functions":
I've generally found it easier to have direct access to the function keys as apposed to single hit volume control.

In the spotlight search box type "CrashReportPrefs"
Select the application and turn on the developer option to get more info about crashes.
This can be useful if you're a developer.

To get rid of annoying HDD icon on desktop:
Open Finder, under Preferences->General->"Show these items on desktop" deselect HDD.

Thursday, July 27, 2006

Getting text manipulation actions to work in quicksilver

I'm always raving about Quicksilver and must do my own little tutorial soon, but for now, this post links to a very good introductory video.

However getting the text manipulation plugin can be an obscure process. I found that the following three steps worked for me.

1) In the quicksilver preferences under "General", select "Enable advanced features" (third tick box down)
2) Now select the "Extras" icon in the left-hand pane. The second option down is the "Application feature level". Select Beta (advanced may also work).
3) Restart quicksilver
4) Move to the plugins pain. At the bottom, to the left of the search box is a popup menu.
Select refresh list of plugins.

At last, your text appending should be available. Install it and have fun :).

Wednesday, July 26, 2006

Getting man pages to work on Tiger

I only recently found out why when I execute,

>man man

I get the error, "No manual entry for man".

It's not because the manual pages aren't installed, but because for some reason the environment variable $MANPATH has been set by default without a sensible set of paths. To fix this problem simply add the following line to your .tcshrc file:

unsetenv $MANPATH

This will cause man to try to figure out sensible places to look for the manual pages.
For more info see the "Search path for manual pages" section of the man manpage.

This is based on my experience of Tiger with the developer tools installed. A friend reports that this problem isn't seen under OS X 10.3.

Wednesday, May 31, 2006

Changing the default shell

I prefer tcsh but Macs now come with bash as the default shell. To change this you can do the following.

Go to Netinfo Manager. This should be in Utilities under Applications. (or use quicksilver)

Next select users, then select the user you want to edit. Make sure you have permission by clicking the padlock at the bottom of the window. Now the values for that user should go from greyed out to black. Double click the shell value and replace /bin/bash with /bin/tcsh or whatever shell you want to use.

When you click away, save the change and you're done.

Fast switching

When you first start playing with your mac it's worth having a look at
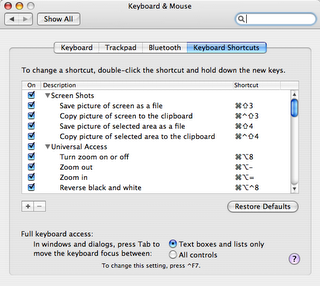
System Preferences->Keyboard and Mouse->Keyboard shortcuts.
keyboard options
For me APPLE+TAB is the most useful. This cycles through all of the applications that are currently running.
If an application has several Windows, you can rotate which has focus with APPLE+` (that's a back tick).

These two together lead to lightning fast switching between applications and windows.

Monday, May 29, 2006

Getting started (Applications)

One of the first things with a new OS is finding the really useful applications. Some of these took me months to come across but I wish I'd known about them from the beggining. Any list like this can only scratch the surface, but these are what have helped me.

Desktop manager: Mulitple desktops on your mac :)

Quicksilver: I have hardly scratched the surface with this, but within an hour or two my dock was obsolete as I can know launch every gui application with alt+space . How cool is that. There is a LOT more depth to this application, and I really must find the time to play with it some more.

MacTheRipper: Wrip DVDs (for backup purposes only of course).

Graphic Converter: Lots of image manipulation and conversion power in this tool.

X11: If you are a developer, installing the X11 tools that come on the developer DVD is a must.

VLC: Great for Video stuff

ourTunes: Really useful for copying iTunes music over your home network for backup purposes.

Fink: This is basically a mac version of the Debian RPM system. Installing other programs is as easy as
fink install

Tripwire: This should be installed as soon as possible. It takes a snapshot of your system and will warn when key files have been modified or deleted. This will help to spot any intrusion of your system.

Tuesday, May 23, 2006

More on spotlight

I just deleted my spotlight metadata catalogue and re-indexed. I was expecting a small difference but was pretty impressed to see it reduced from 329MB to 174MB. Took 3 hours for the re-indexing but worth it for my meagre HDD.

The tool I used to delete the database was called Tinkertool. It is shareware and has a host of optimisation and performance tools. five evaulations are allowed for free before you have to pay seven euros.

Friday, May 19, 2006

gvim

Vim comes pre-installed, but macvim
is the best solution I've found for gvim, the GUI version.

The instructions on the site a pretty good, but I'd recommend looking out for the suggested script that allows you to fire up multiple instances of gvim.
eXTReMe Tracker